Thursday, October 6, 2016

Making Reading & Counting More Interactive


Book + Magnets = Learning Beyond the Pages 

Ten Little Princesses

 
https://www.amazon.com/Melissa-Doug-Wooden-Princess-Magnets/dp/B00ND5XOFC/ref=sr_1_2?s=books&ie=UTF8&qid=1475787721&sr=8-2&keywords=melissa+and+doug+princess+magnets

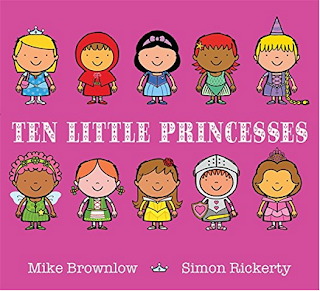
I'm always looking for new and fun ways to extend Annalee's learning beyond the pages of a book and make stories come to life. Added elements make story time more fun for me, too! Enter "Ten Little Princesses" and these Melissa and Doug magnets, and these two items went beyond a logical pairing and are more like a match made in Heaven. The colors of the book illustrations and magnets coordinate in a way that make it seem they are made for each other.  Adding the dimension of magnets makes the concept of counting more tangible and fun. I had purchased this book at Barnes and Noble in the children's sale section that is always there, but it looks like Amazon is still cheaper than the B&N sales price, and then lo and behold, for Annalee's 1st birthday, she was given the adorable Melissa and Doug princess magnets. Annalee at 21 months old now is finally at a stage where she can follow instructions throughout the duration of a whole book (on some days). After placing 10 princess magnets up on her magnet board, I have her take down one princess each time a princess is subtracted in the book and then we count the remaining princesses left on the board. She seems to gravitate more to this book now after having the added dimension of the magnet play. We don't own the book below, but I'm thinking of purchasing in the spirit of Fall and Halloween and pairing them with some Halloween magnets like the ones from Wal-Mart below.

https://www.amazon.com/Ten-Little-Monsters/dp/140833402X/ref=sr_1_2?ie=UTF8&qid=1475789121&sr=8-2&keywords=10+little+monsters


Wednesday, August 7, 2013

A Big Hello!

Hi Crafty Friends!

Where do I begin to explain my long hiatus? I have definitely crafted, but the nature of my craftiness has expanded from paper projects to DIY home projects (stay tuned for posts documenting everything) because Kyle and I bought our very first house in February, and in a nutshell, our new home has been all consuming in a very good way.

TO get right to the point, now that my craft room (YAY for a craft room! picture below) is in good working order, I am trying to replenish my greeting card stash before the school year starts again because I always like to have a stockpile that I can just pull from when occasions arise. Here is a birthday card that I am submitting to the Peachy Keen Stamp Challenge 13-31 Anything Goes!


Materials:
  • Cricut Once Upon a Princess
  • Peachy Keen Princess Faces 1 1/8
  • Peachy Keen Cherub Assortment 1"
  • Red stickles on the crown on the card
  • my MAC blush for their cheeks 
  • jelly roll pen for the faux stitching
  • some little bling jewels for her necklace 


I like to mass produce cards as much as possible because I know how time consuming each card is, and to make several of the same card saves me time down the road, so the picture below shows the other little divas that will  be placed on similar birthday cards. The two little girls on the ends have the Cherub Assortment faces on them.


One of the things I really like about having a blog is the journaling of some memories that accompanies the photos, and so for my own benefit, I am going to fill in more gaps of what else Kyle and I have been doing since our last post.

  • January: escrow papers and packing
  • February: moving, re-carpeting the upstairs, and floor to ceiling paint throughout the whole house
  • March: started on the craft room
  • April: co-producing our high school's Faculty Follies Production
  • May: counting down for summer, garage sailing, craigslist searching (some GREAT finds that I will share later)
  • June: Kyle graduated from his MBA program
  • July: Fallen Leaf Lake and My First Cheer Camp as Cheer Advisor! 
  • August: No Cheer! Pinterest and Paper Projects Galore / Lots of Reading - finished The Power of Habit, And the Mountains Echoed, and I'm in the middle of Weird Sisters and The Golem and the Jinni. The only one I wouldn't recommend is And the Mountains Echoed. 

The preliminary pictures of my craft room will be uploaded later this afternoon. I just downloaded googleplus, which links my iphone pictures directly to my blog, so I can upload anything from my iphone super quickly! Right now, all 400 plus pictures are being backed up, so it will take some time, and I have to run some errands.

Thanks for reading. It feels good to be back! :)

Best, Katie A.


Tuesday, December 25, 2012

Merry Christmas!

 Hi Everyone,

WOW! I can't believe a month has gone by since my last post. School has taken all of my time up by storm, and though I've crafted a tiny bit here and there, I haven't had the time to post about it.

Today, I'm sharing little elf place holders / gift bag embellishments with you. I'm recycling these little guys so that they can be enjoyed multiple times. Today I used them to embellish these little cute M&M gift bags, and between now and Friday, I'm going to personalize them for my husband's side of the family for our Christmas celebration with them. I'm submitting this project to:
Peachy Keen Stamps "Anything Goes" Challenge

Here they are! Enjoy!

Recipe:
I found this little elf doll in the Silhouette store, and I fell in love. Because they were SO labor intensive to assemble, and I was making 12 of them, I forfeited all inking and any other embellishment than my cute Peachy faces, blush, and little freckles with my gelly roll pens. I used the Happy Lashes set from Peachy Keen for their little faces.

I attached the little elves to the little candy packs that I made. I LOVE the finished product!

Hope you all have a very blessed Christmas with your loved ones!

Love, Katie A.

Tuesday, November 20, 2012

Happy Thanksgiving!

Hi All,

Hope you are all happy and ready for Thanksgiving as it is quickly approaching!! This year is already flying by; I can't believe it. Though I haven't done any grocery shopping yet for Thursday, which we are partially hosting, I DO have my placeholders completed. :)

This was quite the undertaking, and something I had wanted to do in years past, but I never got around to it. This year, Peachy Keen's Color Challenge inspired me to take action! I am including these little guys in the following challenges:

Little Scrap Pieces: "Fun Friday Use an Animal"
My Craft Spot Challenge #76 Thanksgiving
Peachy Keen Stamps Color Challenge #44


Recipe:

  • Cricut Paper Doll Dress Up
  • Cricut Create a Critter
  • Nestabilities for the placeholder background
  • Sizzix Embossing Folders
  • eyelets in the leaf
  • My Creative Time "Everyday Bingo and Crossword"
  • wine corks
  • Peachy Keen Stamps: PKSC - 07 July 2012 for my pilgrim boy, and Native American boy and girl
  • Peachy Keen Princess Faces for my cute pilgrim girl
  • Peachy Keen - Create a Critter Faces for my turkey
  • PK 490 Everyday Face Assortment for my leaf
  • Various ribbon
  • Hemp
In case you are wondering about the wine cork placeholders, they were SUPER easy to make - all you have to do is save your wine corks, and saw a slit into the top of the cork(s) using a sharp knife - just be careful! :)

I hope all of you have a very blessed Thanksgiving!

<3, Katie A. 


Sunday, November 11, 2012

"Glitz & Girly" Christmas Wreath

Hi Everyone,

You know that TV show on TLC, "My Big Fat Gypsy Wedding?" Well, I feel like this wreath embodies the glitz and glamour of that show. LOL. I will be submitting this project to Peachy Keen Challenge #43 "Anything Goes," Crafty Catz #158 "Anything Goes," and Paper Crafting Journey "Anything Goes."

Directions on how to assemble wreath by steps:
1. buy basic supplies:

  • any type of wreath (a woven sticks wreath from Dollar Tree)
  • lots of tulle (I had some left over from these tutus I had made last year)
  • feathers (these were leftovers also)
  • clothespins (mini and large size)
2. cut tulle into strips (approximately 9" long by 2" wide) I didn't measure, I just eye-balled, but after I made it, I looked at some instructions myself, and that's what many of them said. 

3. Using the loop and pull method, tie the tulle strip by strip onto the wreath until you get each section to look full. (This takes awhile!) I would say approximately 2 hours for the 12 inch wreath.

4. Hot glue feathers and add left over tulle to some pretty ribbon to tie a giant ribbon

The embellishment directions are down below if you care to read more!


Here I have a close-up of one of the added embellishments made with My Creative Time's Scalloped and Stitched circle dies and All Around Everything Stamp Set, and her Rolled Flower Die. The entire scallop, circle, and flower piece is actually attached via Velcro, so I can take it off and replace with anything I'd like. I love the versatility that the clothespin allows also: right now, it is holding a tag with a heat embossed sentiment from Peachy Keen.
This little cutie, is also made with Peachy Keen stamps. The ribbon scarf is ribbon made from "Little Scrap Pieces." The tag was made from Tim Holtz Big Tags die, and I heat embossed the big trees as a background. (I bought that tree stamp from Paper Source). I stickled her hat, gloves, and shoes to stick with my pink theme.

 I modpodged all of the clothespins with this leopard paper to provide a nice contrast with the pink.

I had A LOT of fun creating, fine tuning, enhancing, and perfecting this wreath!

Hope you have a wonderful Veteran's Day weekend. I thank God for all of the troops who are willing to risk their lives in service to our country!

<3, Katie A.

Monday, November 5, 2012

Free "Fall Y'all" Card Set Giveaway!

Hi Crafty Friends,

I hope you are doing well, and if you are on the east coast that you are staying dry and safe in the aftermath of Sandy.

Today I have a card that I am submitting to the following challenges:
Peachy Keen Stamps #42 Sketch Challenge
That Craft Place: Tic-Tac-Toe 
Challenges 4 Everybody: Challenge #6 Anything Goes 


Card Recipe:
  • Silhouette Scarecrow 
  • Peachy Keen "Happy Lashes"
  • buttons
  • Scrappy Mom's Stamps for the sentiment (I heat embossed it)
  • multiple coordinating card stock to layer creating dimensions through borders
  • decorative tape
  • Tsukneko / Tim Holtz ink

Additionally, I have a "Happy Fall Y'all" card set giveaway. The set includes the card posted above as well as 3 additional fall themed cards (1 of the 3 is posted below).


Eligibility
  • Become a follower of my blog by Friday, November 9th! :) 
  • Comment on this post so I know how to track you down in case you win.

I will do the drawing on Friday after 5PM via random.org to select one lucky winner!

Have a wonderful rest of your week!

<3, Katie A.

Sunday, October 28, 2012

Established 2010

Hi Guys,

Hope you had a lovely weekend! I did! My birthday celebration continued into the weekend...Friday night, I had dinner with my husband after which he gifted me with the Silhouette Cameo, which I got to play around with today!!!!!!!!!!!! To end the weekend, we saw one of my old Disney choreographers in a one man song and dance show in downtown LA at the Federal. Such a wonderful way to end the weekend.

My project for you today is my very first Silhouette project. I had been wanting to make a sign like this for awhile now, but part of me was waiting until my husband and I bought our first house. Peachy Keen's challenge this week though inspired me to make it a bit earlier. I am not 100% sold on how it turned out, so maybe I will use this one as a solid draft for a new one when Kyle and I eventually DO find a house!

I will be submitting this project to: Peachy Keen Challenge 41 "3-D Wall Art"


I think what bothers me about this wall art is that the balance is slightly off; I guess Kyle and I will have to add some babies over on the right hand side to fix that.

General Materials used:

  • Old Frame / cork board that I repurposed for this project
  • Silhouette Cameo for all of the phrase, letter, and number cutouts (I learned about the "offset" shadow function immediately!)
  • Peachy Keen SC-07 2012 for my doll faces
  • a flouncy burlap flower on the top corner

More Specific Materials

  • gelly roll pen for the whites of my doll's (AKA Katie and Kyle) eyes
  • Cuttlebug embossing folder for her leopard print dress. :)
  • button
  • baker's twine


More Specific Materials

  • My Creative Time's "Coffee Break" stamp set (I heat embossed the A and the little flower below)
  • more buttons


That's all for now. Thanks for reading and stopping by. Have a fabulous week!

xo,

Katie A.